Instructions for Submitting the Custom Data Form
Before beginning the process of completing our Custom Data Form, you must first decide what information you want imprinted on your tags and what format you would like us to use. Remember, a number of different formats were used at various times throughout the war, and these formats sometimes differed slightly from unit to unit. You may use one of the sample formats shown below, a slight variation of one of them, or a totally different format altogether.
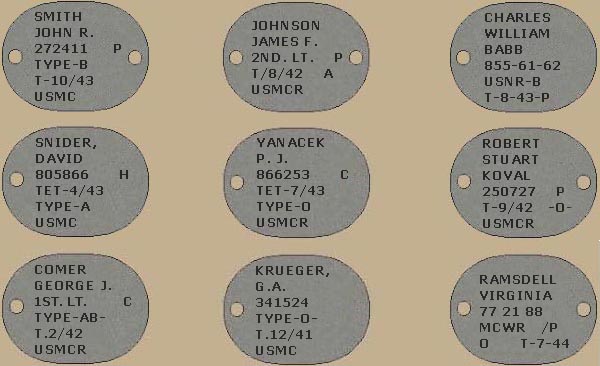
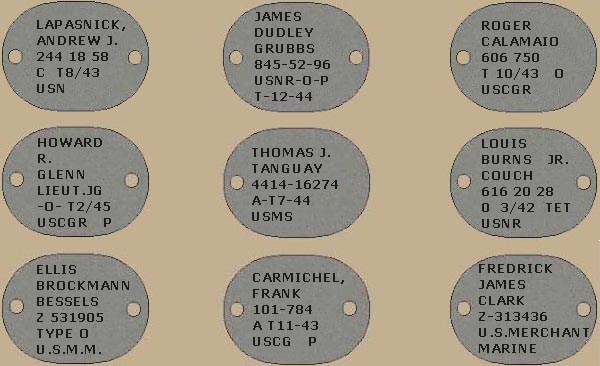
Once you have decided on a format and the information you want imprinted on your dog tags, we recommend that you write it down on a piece of paper. Write it down exactly as you want it to appear, including spaces and special characters such as commas, periods, dashes, and slashes. Remember, the basic information that was imprinted on each tag was:
● Last name;
● First name and initials (or sometimes just initials);
● Rank (only in the case of officers);
● Service number (only in the case of enlisted personnel);
● Religious preference ("C" for Catholic, "H" for Hebrew, "P" for Protestant, or blank for no preference);
● Month and year of the last tetanus shot;
● Blood type (A, B, AB, or O—never with Rh factor (+ or -) as its importance was not really known and understood at the time) and;
● Branch and component of service (USMC, USMCR, USMCWR, MCWR, USN, USNR, USNWR, USCG, USCGR, USMS, USMM, and others).
Please note that we cannot add a fingerprint to the reverse side of any dog tags you order from us. A safe process for you to do this if you so desire, is discussed at the below link.
Adding a Fingerprint to your Dog Tags
To complete your order, please follow the instructions below, exactly as indicated. Failure to do so may result in delaying the completion of your order.
In addition, please be aware that our Custom Data Form only permits customers to provide us with information for one set of dog tags at a time. If you ordered multiple sets that require imprinting, you will need to submit a separate Custom Data Form for each set that your ordered. Following each successfully transmitted Custom Data Form you will receive notification, along with a link that will permit you to return to this page to submit addition forms.
1. Begin by opening the Custom Data Form by depressing the link at the bottom of this page. However, before doing so, please read each of the remaining informational items provided below to ensure you have a complete understanding.
2. Once the Custom Data Form opens, enter your name, e-mail address, and the address to which your completed order should be shipped in the indicated spaces. These items should match the information you provided when paying for your order.
3. Select the type of dog tag you ordered that you want us to imprint with the information you are going to provide.
4. Read the "Instructions Review" and check the box to confirm your understanding.
5. Indicate the information you want imprinted on each line of your dog tags. All imprinting will be flush-left unless specified otherwise in the "Additional Instructions." There is a limit of 10 characters per line with a maximum of 6 lines. An entry on Line 1 is required, but only enter information on the number of lines you desire. If you enter less than 6 lines of information, the lines you entered will be vertically centered on the dog tags unless you specify otherwise in the "Additional Instructions." Enter letters using CAPITAL LETTERS. Enter all numbers, dashes, slashes, periods and commas where they are desired. Use asterisks (*) to indicate where and how many blank spaces you want between letters and/or numbers and special characters. The asterisks will not be imprinted but are necessary for us to be able to complete your order to your expectations. Here are a few examples:
"John J." would be written on the Custom Data Form as "JOHN*J."
"800123 P" would be written on the Custom Data Form as "800123***P"
"T-9/42 -O-" would be written on the Custom Data Form as "T-9/42*-O-"
6. Enter any additional instructions or remarks in the "Additional Instructions" field at the bottom of the form.
7. Read the "Information Review" statement, check each of your entries for accuracy, then check the box to confirm you have done so.
8. Just above the submit button is a "Captcha" image with a word that you must type into the text box directly below this image. Failure to do this will prevent your Custom Data Form from being submitted.
9. Depress the "Submit Form" button to sent us your Custom Data Form. When the form has been successfully transmitted, you will receive a notification with additional instructions, should they be needed.